bloglovinBloglovin iconCombined ShapeCreated with Sketch. Fill 1Created with Sketch. Fill 1Created with Sketch. Fill 1Created with Sketch. Fill 1Created with Sketch. Fill 1Created with Sketch. rssRSS iconsoundcloudSoundCloud iconFill 1Created with Sketch. Fill 1Created with Sketch. Fill 1Created with Sketch. Fill 1Created with Sketch. arrow-lCreated with Lunacy arrow-rCreated with Lunacy mix-lineCreated with Lunacy pinch-lineCreated with Lunacy searchCreated with Lunacy

Categories

Handmade Valentines

**Don’t forget to enter the Happy Birthday Give-Away. I’ll choose the winner at about 5pm Pacific Time tonight!**

I enjoy making things, and that includes Valentines. I think it is big-time fun to sit around with my kids and come up with ideas for little notes of friendship they can make and give to their classmates every February 14th. Two years ago we made heart-shaped crayons attached to these cute little printables from The Long Thread. Last year we bought a box of fortune cookies, dipped them in almond bark and candy melts, covered them with festive sprinkles, and put them in cellophane bags with a sweet message saying, “I’m so FORTUNE-ate to have you as my Valentine”.

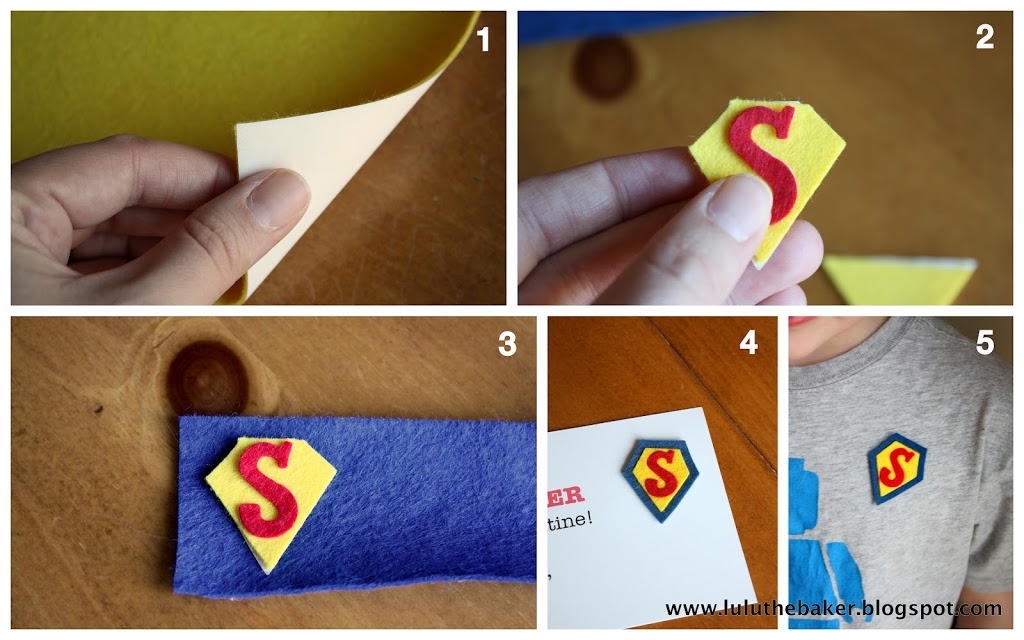
This year, our little tomboy needed something special and not at all girly to give to her fellow kindergartners. She adores Superman, so we came up with a fun idea for a candy-free card for her classmates. We made little Superman logo badges out of felt, hot-glued a bar pin to the back, and attached them to cards we printed that said, “You’re SUPER Valentine.”

This is the kind of project where exactly how you go about it depends a lot on what materials you have/what you can borrow from friends. So, instead of a tutorial, here’s a quick run-down of what we did.

We used three colors of wool-blend felt: red, blue, and yellow. I buy my felt online either from Prairie Point Junction or from Benzie Bazaar on Etsy. I didn’t want to have to glue all of the little layers of felt together, so before I started cutting anything out, I ironed some Heat-n-Bond Lite to the back of the red and yellow felt sheets; after everything was cut out, all I had to do was layer the felt and iron it together! I knew 30 diamond shapes would be easy to cut out, but I’ll be danged if I was going to cut out 30 little red felt S’s, so I borrowed a die-cutter from my friend. It only took about 5 minutes to cut out all those little guys! For the yellow layer, I started by cutting long strips, then cut the strips into triangles, then snipped two corners off the triangles to make diamonds. Then I put the yellow layer on top of the blue and eyeballed where to cut. Again, once everything was cut out, we just peeled the backing off the yellow and red layers, stacked them up on top of the blue, and ironed them; so much easier than gluing! After everything was cool, we hot-glued a bar pin to the back.

The cards are simple and you could easily make them yourself, but if you’re short on time, click HERE to get a printable version of the cards we used. We printed them on white cardstock, quartered each sheet, and punched two holes about 1″ apart so we could attach the pins.

Leave a Reply

Your email address will not be published. Required fields are marked *

This site uses Akismet to reduce spam. Learn how your comment data is processed.