
I am beyond excited to kick off a series I’ve been working on with a few friends for quite some time now: Endless Summer Projects! I’m teaming up with Alexandra from
Alexandra Hedin, MJ from
Pars Caeli, and Jennifer from
Classic Play to bring you one awesome, kid-friendly project per week all summer long! We have a fantastic line-up for you guys–everything from backyard games and garden art to summer bashes and memory-making. To start the series off, I have a wonderful garden art project for you: Mosaic Stepping Stones!
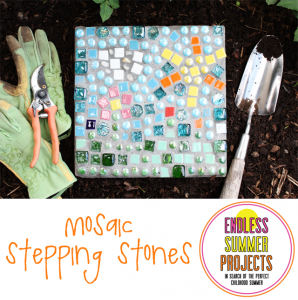
Nature doesn’t need much help in the beauty department, but a bit of handmade garden art adds a sweet touch to backyards big and small, especially when little hands have helped create it. Mosaics are a great way for kids to let their personalities shine, and to claim their own little corner of the world. These stepping stones are a great summer project on so many levels. They bring together a variety of bright colors, textures, and shapes, result in a long-lasting keepsake, and best of all, provide hours of fun over a couple of days!
This project is for children 3 years and older, and should be supervised by an adult. Some steps below are not suitable for small children; those steps should be completed by an adult and are noted.
Materials & Tools
hardware store purchases:
garden pavers or stepping stones (ours were 12x12x2″ square cement pavers)
sanded grout (I chose grey grout to match my pavers, but you can choose whatever color you want.)
wooden paint stirrer
grout sealer
craft store purchases:
mosaic materials (mermaid tears, small ceramic tiles, smooth glass tiles, rocks and pebbles, etc. Avoid materials with sharp edges)
strong glue (I like E6000 for pretty much everything in life)
other materials:
disposable gloves
2 medium plastic buckets (cheap summer sand buckets are perfect) or empty coffee cans
water
large garbage bags or lots of newspaper for covering surfaces
clean kitchen sponges that you don’t mind throwing away
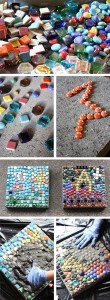
1. Design Set the pavers down on a flat surface. Get all of the mosaic materials out where you can see them and start creating your masterpiece! Mosaic pieces should not be touching each other, but should be about 1/8″ apart. My kids actually spent at least an hour doing this part. They would start a picture, spend a half hour creating it, change their minds, and clear off all the tiles so they could start their next creation.
2. Glue When all of the tiles are in place, use strong glue to secure the pieces one at a time. Allow glue to dry completely before moving on to Step 3. Refer to glue package for drying time. This step should be completed by an adult or older child.
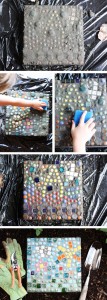
3. Grout When the glue on your mosaic is completely dry, you’re ready for the grout! Start by laying down lots of newspaper or big garbage bags to protect the area you’re working in. We did this step in the garage with the door open, but the backyard would be perfect. In a clean plastic bucket or empty coffee can, combine grout and water according to the instructions on the grout package. Every brand will be a little different, but here’s the gist:
- Combine grout (powder) and water in the bucket and stir for 5 minutes using the wooden paint stirrer; let the mixture sit for 10 minutes.
- Stir the mixture again, then begin applying it to the mosaic with your hands. Feel free to glob it on, and be sure to wear disposable gloves (cement is very drying).
- When all of the gaps are filled, use the side of your hand to scrape off excess grout. It doesn’t have to be perfect at this point, but you should be able to see at least a little bit of all of your pieces. Let the grout set for 20 minutes.
- Meanwhile, fill your 2nd bucket or coffee can with clean tap water.
- When your wait is over, use a clean, damp sponge to wipe the remaining grout from the top of each tile. Rinse your sponge often in the bucket. You don’t want the sponge dripping wet; be sure to ring it out really well each time you rinse it. When the water is dirty, dump it out in the gutter and get clean water. Continue wiping the top of the mosaic until you are happy with how it looks. Allow to dry 2-3 hours. This entire step can be done by children under adult supervision, but I should warn you that wiping the tiles down takes quite a bit of time, and my kids let me finish that part for them. They did, however, thoroughly enjoy smearing grout all over their stepping stones. They could have done that for hours!
4. Shine When the grout is set, use a soft cloth to gently buff the top of the mosaic. This will remove any haze or cloudiness left behind by the grout. Allow to sit overnight.
5. Seal Apply grout sealer according to package directions, and allow to dry completely. This step should be completed by an adult. We used a spray-on grout sealer and it was very easy; we applied two coats, and the whole process took less than 20 minutes, most of which was waiting time.
6. Place When grout sealer has dried completely, find a nice spot in your yard or garden, and place your stepping stone!
Meet my Endless Summer Project teammates!
Be sure to tune in to Alexandra Hedin next Wednesday for your second Endless Summer Project!


So Cute!!
Thanks Jenn! You should make them with your girls this summer and let me know how they turn out!
Ooh so much fun! There’s something so satisfying about doing that final wiping off of the grout to reveal pretty stones. I bet your kiddos were thrilled about this project! This would be a good way to bring some personality to our empty balcony. I’m putting it on the summer fun list.
This was actually my first experience with grout, and I totally agree. It’s like heavenly choirs singing!
Love how this all turned out! And looky there, I get to be on Lulu the Baker, too. Thanks for thinking up this great series!! xo
Thanks for teaming up with me, MJ! I’m so excited to see how the rest of the series shapes up!
what a great idea! and thanks for the thorough instructions!
Interesting Blog!!! Keep up the good work. STONERA Systems – Sealers for Stone & Tile are proud Indian manufacturers that produce a variety of excellence sealing products to protect and enhance surfaces including natural stone, marbles & stone.
Sealer for stone